I chose to present my research and planning (and my evaluation) in the form of a blog, and in order to do this I set up a blogger account and accounts for Soundcloud and Youtube so I would be able to upload sound files and videos regularly onto my blog to show my research.


To film my teaser trailer I used a digital video camera (Panasonic HDC TM900) - it was easy to film this way with this camera as I could take a countless number of shots and it was easy to erase the shots I was not happy with.


As I found out in my research, taglines were a consistent convention of both posters and teaser trailers, and it was imperative to use them in my teaser trailer. To create my taglines I used photo shop.


Using a blog to display my research and planning has had many benefits - not only is it easier to organize and manage tasks, but it is more engaging for the reader and it is easier to support my research with examples of images, video clips, sound files and links. These were easy to upload and really enhance the look of the blog for the reader.


To film my teaser trailer I used a digital video camera (Panasonic HDC TM900) - it was easy to film this way with this camera as I could take a countless number of shots and it was easy to erase the shots I was not happy with.
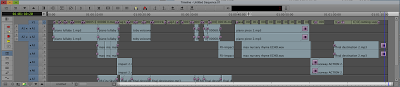
In conjunction with the editing software I was able to upload my shots onto the system, arranging the shots in separate bins, giving me more time to edit.


As I found out in my research, taglines were a consistent convention of both posters and teaser trailers, and it was imperative to use them in my teaser trailer. To create my taglines I used photo shop.


I began by uploading all my shots putting them in separate editing bins. This made it easy for me to access my shots when I needed them (as I had labelled each shot carefully). I had various other bins for music, sound effects, titles and captions. The benefits of organizing the editing this way was that it made editing the actual trailer much smoother - spending time organizing the material really paid off during the editing. Because I had created a shot list and storyboard I already had a running order, so the bins I had created allowed me to stick to it. To edit, I opened each shot and trimmed them and I went on to place each shot on the first layer of the time line. The multi track feature in the software allowed me to place all my shots onto one layer and all the other elements, like music and sound effects, and titles and captions on separate layers.
This allowed me to move different elements along the time line individually, so the mixing flowed much more seamlessly. The nine layers on the time line allowed me to add effects like audio and video fades (both essential components of teaser trailers)
When I decided on the music I wanted to use from Spotify I used the Adobe Audition software to cut down the tracks The digital technology in post production allowed me to be creative and utilize all the software to create a successful teaser trailer.
The extensive use of Photoshop was what allowed me to successfully create my poster and magazine cover. Photoshop allowed me to be creative and manipulate images altering colour schemes and fonts. I used a range of tools including the magnetic lasso (the tool I used to crop around images to isolate them), the eye dropper tool and the smudge tool.
Here are the various stages of my magazine front cover as I was creating it with photoshop:
I often used this tool to link various items together so that if I needed to change the layout I could move them all together. For example I linked the website, date, issue number, price and tagline together with the masthead. I also linked all the information in the red banner at the bottom of the cover together. This makes it easier to move items around, while keeping certain things together.
I also used drop shadows on the majority of the words on my cover. This emphasises the words more, making them stand out. This especially helped in areas such as where the main cover line goes across the white shirt of the central image as giving the writing a black shadow in the background made the words stand out more and more recognisable.
Here are the various stages of my poster while I was creating it on photoshop:


No comments:
Post a Comment